Table of Contents
This guide explains how to unlock all‑core Turbo Boost on Intel Haswell‑EP systems using S3TurboTool — the most up‑to‑date and convenient method.
Credit for the utility and the new unlock driver goes to ser8989.
Compared to the classic EFI‑shell unlock and other old methods, S3TurboTool offers several advantages:
- One‑time setup: persists across OS reinstalls and hardware changes
- Convenient: all required tools are bundled with the program
- OS‑agnostic: works with any operating system
- Survives sleep: unlock stays active after S3 sleep/resume
- DXE driver generation for dual‑socket systems
- Option to mute the onboard beeper
- RAW driver for single‑socket boards that lack the PchS3Peim module. Like the PEI driver, RAW does not lose unlock after sleep. It’s intended for boards whose BIOS does not contain PchS3Peim, making PEI impossible.
Quick Overview
- Compatibility: Intel Haswell-EP only (Xeon E5-2600/4600 v3)
- Performance gain: +10-30% in multi-threaded workloads
- Difficulty: Advanced (BIOS modification required)
- Risk level: High (potential hardware damage)
What is Turbo Boost Unlock (TBU)?
Turbo Boost Unlock is a firmware-level tweak that forces the CPU to hold its maximum single‑core turbo ratio across all cores, regardless of thread count. It bypasses stock Turbo Ratio Limits and some power management behaviors to raise sustained all‑core clocks. This is not base clock overclocking and not a classic multiplier unlock.
Important: TBU works only on Intel Haswell‑EP (Xeon E5‑2600 v3\4600 v3). It does not work on Broadwell‑EP (v4).
Unintended behavior (Intel bug): TBU exploits an unintended behavior in Haswell‑EP firmware/power management. It is not an official Intel feature and is not supported by Intel. Use at your own risk.
Pros
- Noticeable multithreaded performance gain (typically +10–30% in non‑AVX workloads, CPU/model dependent)
- Smoother frametime in games with background tasks (streaming, recording, browser, overlays)
- Persists across OS reinstalls and survives sleep/resume when implemented via S3TurboTool
- Can be combined with safe undervolting (core/cache) to reduce temperature, noise, and power draw
- OS‑agnostic: works on Windows, Linux, etc., because the change lives in firmware
Cons
- Higher sustained heat output and power draw; stronger CPU cooling and VRM airflow are required
- May require limiting deep C‑states (e.g., disabling C6), which can raise idle power on some boards
- Risk of bricking the motherboard if the BIOS is modified or flashed incorrectly; warranty implications
- Compatibility depends on the motherboard/BIOS; certain implementations require specific PEI/DXE/RAW drivers
Rollback: Reverting to stock behavior is as simple as flashing the original, unmodified BIOS image.
System Requirements
Hardware Requirements
- Intel Haswell-EP CPU (Xeon E5-2600/4600 v3 series)
- Compatible X99 motherboard
- Adequate cooling solution
- Quality PSU with sufficient wattage
Software Requirements
- Windows 10/11 with Administrator privileges
- S3TurboTool v1.53 (download below)
- BIOS backup (original firmware)
Do not use a BIOS that already has an old‑method FFS unlock driver integrated.
Download S3TurboTool v1.53
All the necessary tools (AMIBCP, MMtool, UEFItool, FPTw) are bundled with S3TurboTool, which you can download below. Besides the tool, you only need a BIOS dump for your motherboard, which can also be made through the utility interface using Intel Flash Programming Tool.
📥 S3TurboTool_v1.53 (~18 Mb)
How to launch S3TurboTool
Run S3TurboTool as Administrator. On Windows 11, you may need to disable Core Isolation (Memory Integrity) and reboot for it to work.
The utility was created by a Russian-speaking enthusiast and not all of the interface is translated. After the first launch, you will see a warning window:
To run the program, you need to right-click on the left button. Check the box to hide this dialog next time.
Step 1. Remove microcode 06F2
If your BIOS already has the 06F2 microcode removed, skip this step.
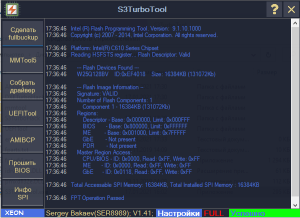
- Launch S3TurboTool and click “MMTool5”.
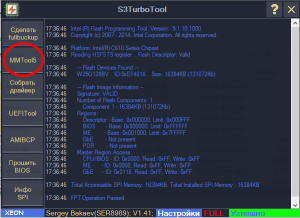
- In MMTool5, click “Load Image” and open your BIOS dump.

- Go to the “CPU Patch” tab to see the microcode list.
- Find CPUID “06F2” in the “CPU ID” column and select it.
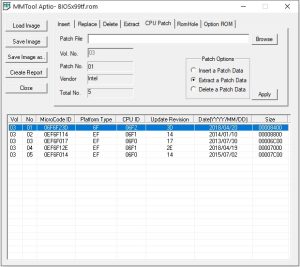
- Tick “Delete a patch data”, then click “Apply” and confirm deletion.

- Click “Save Image” and close MMTool.
Step 2. Configure CPU C State Control
- In S3TurboTool, click “AMIBCP”.

- In AMIBCP, open your BIOS image.
- Navigate: “Common RefCode Configuration > IntelRCSetup > Advanced Power Management Configuration > CPU C State Control”.
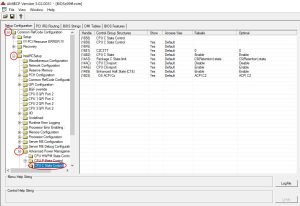
- On the right, in the “Optimal” column, set:
- Save changes and close AMIBCP.
Why these settings: With Turbo Unlock active, deep C‑states (especially C6) can trigger hangs on some X99 boards due to aggressive power‑gating. Limiting the package to C2, keeping C3 reporting enabled, and disabling C6 avoids those deep power‑gate transitions, improving idle and S3‑resume stability.
Step 3. Build the unlock driver
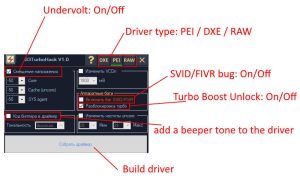
- PEI driver. Supports sleep mode, supports only single-processor systems, does not support branded motherboards. Choose it if you have a Chinese board.
- DXE driver. Does not support sleep mode, supports both single and dual-processor systems (sleep will work on a dual-processor system), supports ASRock and GIGABYTE boards
- RAW driver. Supports sleep mode, supports only single-processor systems, does not support AVX mode unlock. Chinese motherboards do not need this driver and it is not recommended to do unlock this way for them. Only for extreme cases, or for unusual branded motherboards.
- Keep “Turbo Unlock” checked. Leave “Use SVID/FIVR bug” for advanced users only (recommended: unchecked).
- Optional: add a beeper tone to the driver (plays on wake; does not affect normal speaker beeps).
- Click “Build driver.” The program will show you a window with a message in Russian. The generated file will be in the “S3TurboHack” folder.

- Core (Vcore): biggest impact on temps and power. Typical stable range −30 to −60 mV; good samples up to ~−100 mV; some “L” SKUs ~−120 mV.
- Cache/Ring (Uncore): commonly −50 to −60 mV. Heavy cache undervolt can harm memory stability and worsen latency; if unsure, keep it slightly less negative than core.
- System Agent (VCCSA): ~−50 mV may work but brings little benefit; safe to leave at 0 mV.
Practical tips: start small (−10 mV steps), change one slider at a time, and validate with LinX (AVX) and TestMem5.
Step 4. Insert the driver into BIOS via UEFITool
- In S3TurboTool click “UEFITool”.

- In UEFITool: File > Open image file → select your BIOS.
- Expand: “Intel image > BIOS region > 8C8CE578‑… (the bottom one) >”.
- Among the first ~20 items, locate module “271DD6F2‑…” aka “PchS3Peim”.
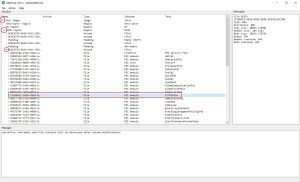
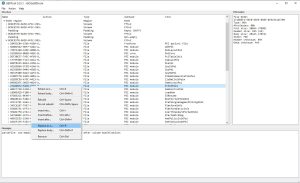
- Right‑click it → “Replace as is…”, then choose the driver you built (in S3TurboHack).
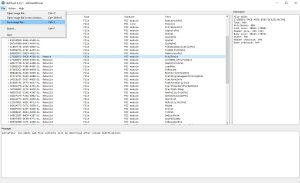
- File > “Save image file”.
What to do if your BIOS doesn’t have the PchS3Peim module. Some motherboards don’t include this module. In that case, use the RAW driver instead. You’ll find the instructions below.
Step 5. Flash the BIOS
You don’t have to use the bundled FPT. You can flash with any compatible method that accepts a modified image.
Click “Прошить BIOS” (“Flash BIOS”), select your modified image, and let the flash process complete. Reboot afterwards.
If the program shows “error 200” during flashing, don’t panic. Most likely the file path is too long. Move the BIOS file to the drive root (e.g., C:\ and try again.
Step 6. Verify
To verify, use HWiNFO to view per‑core frequencies. In parallel, run a benchmark or stress test (e.g., CPU‑Z) to load the CPU. 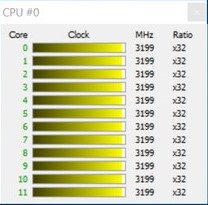 If everything worked, each core should hold the CPU’s maximum turbo bin under load.
Extra: How to add a DXE driver for dual‑socket systems
S3TurboTool can build a DXE driver that works correctly on dual‑socket systems (previously such systems required EFI drivers).
- In S3TurboTool click “Build driver”.
- Click the DXE button (top‑right).
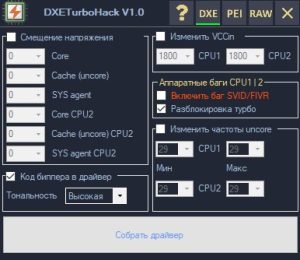
- Set your voltage offsets. Optionally enable a tone on power‑on and wake. Click “Build driver”.
- In S3TurboTool click “UEFITool”.
- In UEFITool, open your BIOS image.
- Expand: “Intel image > BIOS region > 8C8CE578‑… (second from bottom) >”.
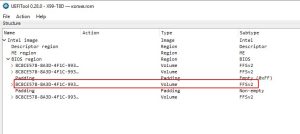
- Scroll to the end and find the last DXE driver in the list.
- Right‑click it → “Insert after…”, then select the DXE driver you built (in the “DXETurboHack” folder).
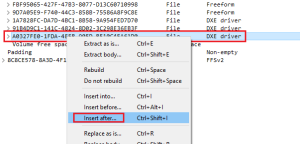
- File > “Save image file…”, save. The BIOS is ready to flash. You can flash it with the corresponding button in S3TurboTool.
Extra: How to add a RAW driver for single‑socket systems
Use the RAW driver on boards whose BIOS lacks the PchS3Peim module, which makes PEI driver use impossible.
WARNING! After installing a RAW driver, do not edit this BIOS image with any tools. Doing so will make it unbootable and brick the motherboard; recovery will only be possible with a hardware SPI programmer.
- In S3TurboTool click “Build driver”.
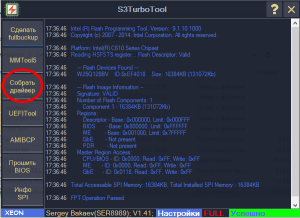
- Click the RAW button (top‑right) and in the dialog select your BIOS file.
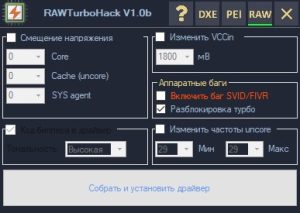
- Set the required voltage offsets. Click “Build and install driver”.
- A BIOS file with a new name will be saved in the same folder and is ready to flash. You can flash it via the corresponding button in S3TurboTool.
Video Instructions


