Table of Contents
On most stock firmwares for Chinese LGA2011‑3/X99 motherboards, the base clock (BCLK) is not exactly 100 MHz by default. It’s slightly lower, for example 99.87 MHz. This has no meaningful impact on performance, but many users prefer seeing round numbers in monitoring tools and in‑game overlays.
Below is a safe, reproducible method to set the reported BCLK to exactly 100.00 MHz using Flash Image Tool (FIT) from Intel ME System Tools and a BIOS dump.
⚠️Warning
Results are not guaranteed and you are solely responsible for any consequences.
Flashing a modified BIOS can brick your motherboard if something goes wrong. Always keep a verified backup and have a recovery plan (SPI programmer).
What You Need
- Your current BIOS dump (backup).
- Intel ME System Tools matching your ME firmware version (contains Flash Image Tool and Flash Programming Tool).
- Monitoring software to verify BCLK: HWiNFO64 / AIDA64 / CPU‑Z or similar.
- Optional recovery: SPI programmer.
Step 1 — Identify Your ME Version
Download the required ME System Tools archive here, but first determine the Management Engine (ME) firmware version used by the BIOS you’ll modify. Use one or more of the methods below.
- BIOS Setup (preferred, if available): Many boards show it on the Main/Information page or under Advanced → PCH‑FW Configuration as “ME FW Version”.
- HWiNFO64 (Windows): Open HWiNFO → Motherboard → Intel ME → “ME Firmware Version”. This shows the exact FW version (e.g., 9.1.37.1002).
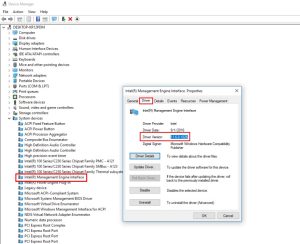
- Device Manager (quick heuristic): Windows → Device Manager → System devices → Intel Management Engine Interface → Driver. The driver version can hint at the ME branch, but it is not the firmware version; confirm with HWiNFO or MEInfo.

Tip: Most X99 boards use the 9.1 firmware branch and require the Intel ME System Tools v9.1 package. Always verify your exact version before proceeding.
Download ME System Tools
⚠️ Disclaimer
These tools are proprietary software owned by their respective copyright holders.
They are not officially distributed to end-users and are provided here strictly for educational and research purposes only.
Use them entirely at your own risk. Neither the website nor the uploader assumes any responsibility for potential damage, misuse, or legal consequences.
📦 Note: Due to hosting and licensing limitations, all software files are shared via Telegram channel.
Join to access the complete collection of tools and updates in one place.
Step 2 — Back Up Your BIOS
Use Intel Flash Programming Tool (FPT/FPTw) to dump your BIOS.
Typically, the command is:
fptw64 -d original_backup.bin
For more information on the Intel Flash Programming Tool (FPT) and its commands, see our guide.
Step 3 — Edit the BIOS in Flash Image Tool (FIT)
- Open FIT, accept the terms, and load your BIOS dump.
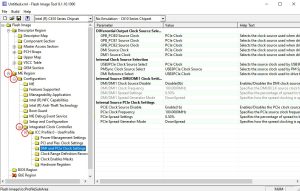
- In the left tree, navigate to: ME Region → Configuration → Integrated Clock Controller → ICC Profile 0 – User Profile → DMI and PCIe Clock Settings.

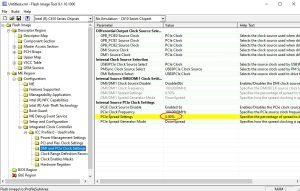
- Find the parameter PCIe Spread Settings and set it to 0.00%.

- In Flash Image Tool, click “Build” → “Build Image”. The built mod BIOS will be saved in the “Build” folder as “outimage.bin”
Note about multiple ICC profiles: Some images show several “ICC Profile X” entries. The active one is typically “Profile 0 – User Profile”. If changes don’t take effect after flashing, repeat the edit for other profiles as well (e.g., Profile 1), keeping settings consistent.
Step 4 — Flash the Modified BIOS
With FPTw you can flash it with:
fptw64 -f bios_mod.bin
Do not interrupt power during flashing. After flashing, we recommend resetting BIOS to factory defaults.
Step 5 — Verify the Result
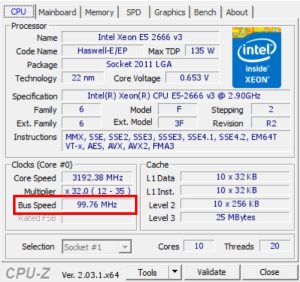
- Boot Windows and open HWiNFO / AIDA64 / CPU‑Z. Check “Bus Clock”/BCLK. It should now read 100.00 MHz.
- If nothing changed and BCLK remains below 99.75 MHz, Windows virtualization features may be forcing a lower effective clock.
If you did everything correctly but the base clock hasn’t changed and it’s below 99.75 MHz, disable certain Windows components described below and reboot.
Why the Base Clock Can Be Below 99.75 MHz
The usual cause is active Hyper‑V (and related virtualization features) in Windows.
How to Disable Hyper‑V (GUI)
- Open Control Panel.
- Go to “Programs” → “Programs and Features”.
- Click “Turn Windows features on or off”.
- Expand “Hyper‑V” → “Hyper‑V Platform”.
- Uncheck Hyper‑V Hypervisor.
- On Windows 10 Home, uncheck Windows Hypervisor Platform.
- Restart the PC.
Optional: Command‑line Toggles
You can control whether Hyper‑V starts at boot without uninstalling it. In this mode, Hyper‑V remains installed but inactive. Using the bcdedit command‑line tool to change Boot Configuration Data (BCD) prevents the Hyper‑V hypervisor from loading before Windows. BCDEdit manages the BCD store, which defines boot parameters, boot applications, and menu entries.
When you disable Hyper‑V via BCD, the feature stays installed but does not start. Because Hyper‑V is a type‑1 hypervisor that normally loads before Windows, this approach simply stops it from launching during boot. You can re‑enable it later without reinstalling.
Temporarily disable the hypervisor boot entry and reboot:
bcdedit /set hypervisorlaunchtype off
Re‑enable later with:
bcdedit /set hypervisorlaunchtype auto
Other Features That Can Lower the Bus Clock — what they are and what happens if you disable them
- Windows Sandbox
What it is: A disposable, isolated desktop that runs untrusted apps in a temporary VM using Hyper‑V. Everything is wiped when you close it.
Availability: Windows 10/11 Pro, Enterprise, Education (1903+). Not available on Home.
If you disable: You lose the Sandbox app. No broader system security impact; regular apps keep working. - Core isolation → Memory integrity (HVCI)
What it is: A virtualization‑based security feature that uses the Hyper‑V hypervisor to isolate kernel memory and block unsigned/unsafe drivers (Hypervisor‑Enforced Code Integrity). Often enabled by default on Windows 11 if hardware supports it.
Availability: Windows 10/11 Home/Pro/Enterprise on supported hardware (SLAT/virtualization enabled).
If you disable: Improves compatibility with older/unsigned drivers and may reduce overhead slightly, but lowers protection against kernel‑level malware and driver exploits. Windows Security will warn that Memory integrity is off; some enterprise compliance policies may require it. - Virtual Machine Platform (VMP) / WSL2
What it is: An optional Windows component that provides underlying VM services. Required by WSL2, Docker Desktop (WSL2 backend), and Windows Subsystem for Android (WSA) on Windows 11. Relies on the Hyper‑V hypervisor.
Availability: Windows 10 (1903+) and Windows 11, all editions (Home/Pro/Enterprise) on supported hardware.
If you disable: WSL2 distros won’t launch; Docker Desktop with the WSL2 backend won’t work; WSA won’t run. Use only if you don’t need these workloads while testing; you can re‑enable later.
Note: All three features rely on the Hyper‑V hypervisor layer. Disabling them (and/or setting bcdedit /set hypervisorlaunchtype off) can help testing BCLK reporting. You can re‑enable the features later via “Turn Windows features on or off” or by restoring the BCDEdit setting to auto.
Troubleshooting and Tips
- Still not exactly 100.00: a reading of 99.99–100.01 is already perfect. Small drift is normal due to oscillator tolerance and monitoring jitter.
- No “PCIe Spread Settings” entry in FIT: confirm you loaded the correct ME/FIT version for your image. On some images the setting may be under a slightly different name (e.g., “Spread %”, “Downspread”).
- Multiple ICC Profiles: repeat the “0.00%” change for all visible profiles (Profile 0/1/2) to ensure consistency.
Restore to Stock (If Needed)
- Flash back your backup:
fptw64 -f bios_backup.bin
If the system doesn’t boot, recover with an SPI programmer.
Written by
Senior Hardware Specialist proving you don't need top-tier gear to game. Expert in smart upgrades and budget-friendly PC restoration.


