![]()
Table of Contents
Socket 1151 is one of Intel’s most successful and long‑lived sockets. Although it first appeared in 2015, Intel supported it through 2020. Four CPU generations ran on LGA1151, and many SKUs are still fairly relevant.
Unlike most previous sockets, LGA1151 has two hardware‑incompatible versions (often referred to as v1 and v2). While both revisions share the same pin count and layout, they differ electrically: the first version supports 6th and 7th gen (Skylake and Kaby Lake), while the second supports 8th and 9th gen (Coffee Lake and Coffee Lake Refresh).
Naturally, enthusiasts quickly began looking for ways to overcome this limitation. It didn’t take long to discover they’re not so incompatible after all. After many experiments, it became clear that unsupported CPUs can be made to run on both LGA1151 v1 and v2. This process is called Coffee‑mod and requires both software and (sometimes) hardware modding. In this guide, we’ll go over the specifics and pitfalls of Coffee‑mod in detail.
With Coffee‑mod you can:
- Run Coffee Lake processors on 100‑ and 200‑series motherboards
- Run Skylake/Kaby Lake processors on some 300‑series boards
- Run Xeon processors on desktop boards
- Run modified mobile processors (“mutants”) on 100, 200, and some 300‑series boards
All processors for the LGA 1151 socket and their specifications can be found here.
⚠️ Important Notice:
Coffee‑mod is an unofficial and experimental modification. By proceeding, you accept full responsibility for any potential issues, including hardware damage, instability, or data loss. This modification will void your warranty.
• CPU thermals: High‑core‑count Coffee Lake CPUs can generate significantly more heat than older chips. Make sure your cooling solution is sufficient and keep an eye on temperatures under load.
• VRM load: These CPUs can also put heavy stress on the motherboard’s VRM, especially on budget LGA1151 boards. Ensure proper airflow around the VRM area and be mindful of overheating risks. Remember that installing an i9‑9900K on budget H110 boards is almost certainly a bad idea.
Recommendation:
Always monitor CPU and VRM temperatures under load, ensure proper airflow, and consider additional cooling (heatsinks or fans) for the VRM area when using high‑performance CPUs.
What you’ll need for the mod
CoffeeTime utility
![]()
We’ll use the CoffeeTime utility — a convenient, modern way to modify firmware for the 1151 socket.
Version 0.99 is currently available, offering an impressive set of features:
- Updating Intel ME firmware and enabling the HAP bit
- Updating VBIOS and GOP versions
- Updating CPU microcodes
- Applying platform compatibility patches
- Various additional tweaks and mods
- User‑friendly graphical interface
Download CoffeeTime
📥 CoffeeTime. Version: 0.99 (~70 MB)
BIOS dump
Besides that, we’ll need a BIOS image to modify. You can either download the required image from the official vendor site or dump it from your board.
ASUS motherboards have a Baseboard S/N and a UUID — unique factory identifiers for your unit. If you don’t transfer them into the new BIOS, you may encounter issues with Windows activation, certain apps, services, etc. The BIOS also stores unique network MAC addresses that are worth preserving as well. That’s why for ASUS boards it’s highly advisable to make a BIOS dump.
If that’s not possible, you can retrieve the data from a working system:
- The S/N and UUID are stored in the module FD44820B-F1AB-41C0-AE4E-0C55556EB9BD (you can find it with UEFITool or similar software). You can view this data in AIDA64 (Computer > DMI > Motherboard or Computer > Summary). You can also obtain the motherboard S/N via the CMD command “wmic baseboard get serialnumber”.

- You can find the MAC address in Windows in the network adapter properties or with the CMD command “ipconfig /all”.


A lost UUID cannot be recovered — be careful!
If your board uses an Intel network controller
The MAC address of Intel NICs is stored in the GbE region and will be lost when reflashing. This may cause network conflicts or even render the NIC inoperable.
If you can’t dump the BIOS, at least save the MAC address. You can find it in the Windows adapter properties; it’s also often printed on a sticker on the board.
For boards with a Realtek NIC, the GbE region is absent; transferring the MAC isn’t required.
SPI programmer
Although some boards can be flashed in software, we strongly recommend getting a programmer. If something goes wrong, it’s the reliable way to bring the board back to life.

CoffeeTime interface, settings, and features
The utility greets you with a prompt to specify the path to the desired BIOS. Do that and click Continue.

After a short loading period, you’ll land on the main screen. This is where the main actions are performed.

At the very top you’ll see information about the board, chipset, BIOS version, and date.

Working with Intel ME
Intel Management Engine (ME) is a separate micro‑controller inside the chipset that runs even before the main BIOS. It handles platform initialization, CPU + PCH compatibility checks, security, and many other low‑level tasks.
In CoffeeTime 0.99, when choosing ME, you can select from four options. The main differences are type (Consumer/Corporate) and version (11.0 / 11.7 / 11.8, etc.). In almost all mods we’ll need the Corporate Cut version with HAP-bit = Disabled
In the highlighted area you can see the ME version and its status (Enabled/Disabled).

To change the ME version, click the three dots, then select the desired version in the drop‑down list and press Replace.

To disable ME, click the icon next to the status.

In CoffeeTime, Intel ME isn’t removed completely; it’s disabled by setting the HAP bit in the firmware: on startup the system initializes ME as usual, but then it’s immediately put into an inactive state and stops performing its functions.
Working with VBIOS and GOP
VBIOS is the “video BIOS” of Intel’s integrated graphics (iGPU). It’s a small firmware module that provides basic functions for screen initialization, resolution settings, timings, etc. It runs in legacy mode (16‑bit code) and is needed when the motherboard BIOS is in CSM (Compatibility Support Module) mode.
GOP (Graphics Output Protocol) is a modern UEFI driver for Intel iGPU. It replaces the old VBIOS in pure UEFI mode (without CSM). GOP runs in protected 32/64‑bit mode, initializes display output faster, supports high resolutions, and doesn’t require legacy compatibility. This is what most modern systems use when booting Windows 10/11 in UEFI mode.
For Coffee Lake iGPU to work correctly on 100/200‑series boards, you almost always need to update VBIOS (to 1059–1062) and GOP (to 9.0.1107).
Conversely — when running Skylake or Kaby Lake on 300‑series boards — updating VBIOS and GOP is usually unnecessary because the stock modules in 300‑series BIOS are already compatible with older Intel graphics.
In the highlighted area you can see the current VBIOS and GOP versions in our BIOS.

Changing versions is the same as with ME. First click the three dots, then select the required version from the drop‑down list and press Replace.

Microcodes
Microcodes are patches for the CPU’s internal ROM. These are small updates Intel creates to fix CPU bugs and improve compatibility. When modifying the BIOS, it’s important to add the correct microcodes for the chosen generation, otherwise the processor may fail to initialize.
In the highlighted area you can see the microcodes present in the BIOS.

Replacing microcodes is similar: click the three dots, choose the necessary microcode versions, and click Replace.

Most mid‑ and high‑end boards can store 3–6 microcodes, so it often makes sense to keep the native architecture microcodes, even if you don’t plan to use them soon.
Which microcodes are needed for LGA1151 processors
- 506E3 — release 6th‑gen Skylake processors
- 506E8 — engineering 7th‑gen Kaby Lake processors (e.g., QL2X, QL3X)
- 906E9 — release 7th‑gen Kaby Lake processors
- 906EA — release/engineering 8th/9th‑gen Coffee Lake (6‑core die, e.g., QNCT, QNVH)
- 906EB — release/engineering 8th/9th‑gen Coffee Lake (4‑core die)
- 906EC — release/engineering 9th‑gen Coffee Lake Refresh (P0 stepping, e.g., QQLT, QQLS)
- 906ED — release/engineering 9th‑gen Coffee Lake Refresh (R0 stepping, e.g., QTJ2, QTJ1, QTJ0, SRFD0/9980HK)
CoffeeTime 0.99 includes EA microcodes by default; they work well for memory overclocking and general compatibility.
Patches and fixes
Displayed in the highlighted area. Applied items are shown in green, not applied — in red. Some may be applied by default.

Patch descriptions:
- PCIe x16 patch — Fixes PCIe slot initialization when installing Coffee Lake (8/9 gen) CPUs on older 100/200‑series boards. Removes the host‑bridge Device ID check in the CPU. Without it, the graphics card often doesn’t work in the x16 slot.
- SKU Hack — Removes artificial limits on core/thread counts (SKU = Stock Keeping Unit). Allows running 6‑core and higher Coffee Lake on boards where the BIOS “sees” only 4 cores.
- Sync cores — Synchronizes all CPU cores (makes their frequency and voltage the same). Useful for stability and overclocking, especially on mutant CPUs.
- Init 8+ CPUs — Initialization patch for processors with 8 or more cores/threads. Without it, the BIOS may fail to start with 6‑core and above Coffee Lake.
- ACPI Tables — Patches ACPI tables (DSDT/SSDT, etc.) so 8+ cores work correctly. Removes errors and crashes on many‑core CPUs.
Fix descriptions:
- 16‑thread support — Full support for 16‑thread CPUs.
- PCIe 1440 — Special patch for BGA1440 mutant CPUs.
- NO_CAP fix — Needed for ASUS 1xxx and 2xxx series BIOSes.
- ME Recovery — Removes the ME recovery module. Useful on some ASUS and Gigabyte boards.
- FD locks — Unlocks the Flash Descriptor — removes all hardware write locks on BIOS regions (ME, GbE, Descriptor, etc.).
Personal Data

This section allows you to transfer MAC addresses and unique identifiers from the original BIOS into the modified one. In our example, we won’t use this option.
EXTRA tab
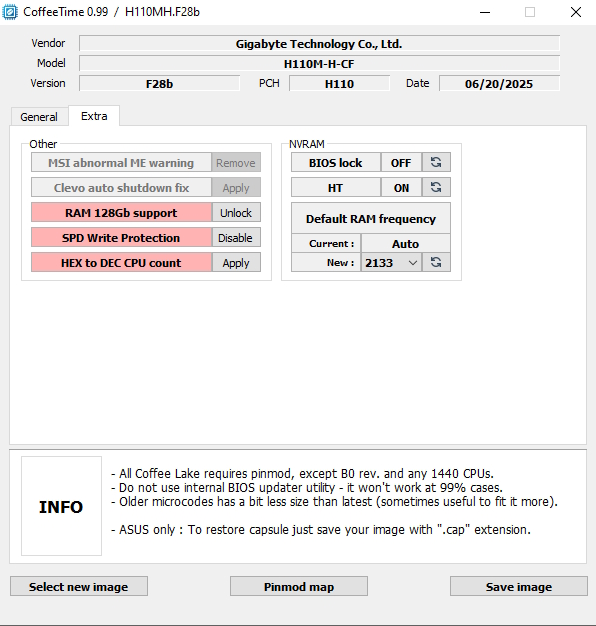
“Other” section:
- MSI abnormal ME warning — Removes the red “ME Firmware is abnormal” warning on MSI boards.
- Clevo auto shutdown fix — Special fix for Clevo. Removes automatic shutdown a few seconds after startup with a modified BIOS.
- RAM 128Gb support — Unlocks support for up to 128 GB of RAM (on boards where stock is limited to 64 GB).
- SPD Write Protection — Removes write protection from SPD (data on memory modules). Useful for memory overclocking and fine‑tuning timings/XMP profiles.
- HEX to DEC CPU count — Converts the core/thread count display from hexadecimal to decimal in BIOS Setup (so instead of “0xA” it shows “10”, etc.). Cosmetic patch only.
“NVRAM” section:
- BIOS lock — Enables or disables the BIOS write lock. If ON, the BIOS cannot be flashed from Windows or utilities.
- HT (Hyper‑Threading) — Forces Hyper‑Threading on or off for all cores.
- Default RAM frequency — Allows you to set the memory frequency that will be used by default on first boot or after clearing CMOS.
Pinmod and Coffee Lake CPU revisions

Pinmod is the isolation and bridging of contacts on the bottom of the CPU. Pinmod is required to run Coffee Lake CPUs (U0, P0, R0 revisions) on 100‑ and 200‑series boards; in other scenarios it isn’t needed.
It’s done with Kapton and metallized tape; you can also use foil, electrical tape, a pencil, and regular tape.

IMPORTANT: Be meticulous when doing the pinmod. Incorrect connections or a jumper that shifts unexpectedly can damage CPU or motherboard components.
Key points for the pinmod:
- For B0 revision CPUs, no pinmod is required.
- The simplest way to make a jumper is to stick a small strip of kitchen foil onto double‑sided tape. Conductive tape or conductive glue will also work. As a temporary solution, a soft pencil will do — draw a trace between the required contacts.
- It’s crucial to ensure the jumper doesn’t move when closing the socket latch and doesn’t touch extra contacts!
- For isolation, use Kapton tape or acrylic lacquer. Electrical tape works too, but is less convenient to use.
- Do not use nail polish for isolation — it’s not durable or heat‑resistant enough.
- Before installing the CPU, it’s advisable to wipe all non‑insulated pads with an alcohol wipe.

Additionally: LGA 1151 pinout diagrams


Coffee Lake CPU revisions
There are four Coffee Lake revisions. The revision determines whether a pinmod is needed, and each revision requires specific microcodes. Note that some models exist in multiple revisions.

- B0 revision — microcode 906EB, uses a 4‑core die and the “old” Kaby Lake substrate. The only revision that doesn’t require a pinmod.
CPUs: G4900, G4900T, G4920, G4930, G4930T, G4950, G5420 (SR3YH), G5500, G5500T, G5600, G5600T, G5600F, G5620, i3-8100, i3-8100T, i3-8300, i3-8300T, i3-8350K, i3-9100, i3-9100T, i3-9100F (SRF7W), i3-9300, i3-9300T, i3-9320, i3-9350K, i3-9350KF
- U0 revision — microcode 906EA, uses a 6‑core die, pinmod required.
CPUs: G5400, G5400T, G5420 (SR3XA), G5420T, i3-9100F (SRF6N), i5-8400, i5-8400T, i5-8500, i5-8500T, i5-8600, i5-8600T, i5-8600K, i5-9400 (SR3X5), i5-9400T, i5-9400F (SRF6M), i5-9500, i5-9500T, i5-9500F (SRF6Q), i5-9600, i5-9600T, i7-8700, i7-8700T, i7-8700K, i7-8086K
- P0 revision — microcode 906EC, uses an 8‑core die, pinmod required.
CPUs: i5-9400 (SRELV), 9400F (SRFAH), i5-9600K (SRELU), i5-9600KF (SRFAD), i7-9700K (SRELT), i7-9700KF (SRFAC), i9-9900K (SRELS), i9-9900KF (SRFAA)
- R0 revision — microcode 906ED, uses an 8‑core die; visually the substrate doesn’t differ from P0, but you can identify the revision by an S‑spec marking “SRGxx” on the lid (for final CPU versions). Pinmod is required.
CPUs: i5-9400 (SRG0Y), i5-9400F (SRG0Z), i5-9500F (SRG10), i5-9600K (SRG11), i5-9600KF (SRG12), i7-9700, i7-9700F, i7-9700K (SRG15), i7-9700KF (SRG16), i7-9700T, i9-9900 (SRG18), i9-9900K (SRG19), i9-9900KF (SRG1A), i9-9900T, i9-9900KS (SRG1Q)
Running Coffee Lake CPUs on 100‑ and 200‑series motherboards
Key points
- You can run Coffee Lake (Refresh) processors on boards with any 100‑ or 200‑series chipset.
- You can run both retail and engineering CPU versions.
- On modified BIOS, retail Skylake and Kaby Lake will still work if you keep their microcodes (506E3 and 906E9 respectively).
- When modifying stock BIOS, iGPU, PCIe x16, and NVMe functionality is fully preserved.
- After modification, overclocking rules don’t change: Z‑chipset is required to overclock K‑CPUs and RAM.
- Coffee Lake works fine with DDR3 and DDR3L memory.
Workflow: determine CPU revision > pinmod > obtain BIOS dump > modify BIOS > flash mod BIOS > boot
CoffeeTime settings
What to change:
- Change ME version to 11.8.77.3664
- Switch ME to Disabled
- Update GOP and VBIOS to the latest versions
- Apply patches and fixes
- Add the necessary microcodes
- (Optional) transfer personal data

Running Skylake/Kaby Lake CPUs on 300‑series boards
The reverse process — running older CPUs on newer boards — isn’t as popular, but it’s possible. The main limitation: it only works on Z370, B365, and H310C (H310 R2.0) chipsets. All other 300‑series boards won’t work with older processors. Even on models with compatible chipsets you can’t be 100% sure everything will work; in some cases there may be issues with XMP, Turbo Boost, or overclocking.
Why only these 3 chipsets? Z370, B365, and H310C are “older” 22‑nm chipsets (based on Kaby Lake PCH). They can work with ME versions for 14‑nm processors (Skylake/Kaby Lake).
Only they allow downgrading the ME version, which is why CoffeeTime can successfully patch the BIOS.
Workflow: obtain BIOS dump > modify BIOS > flash mod BIOS > boot
CoffeeTime settings
What to change:
- Change ME version to 11.7.0.3307
- Switch ME to Disabled
- Since our board is from Gigabyte, apply the ME Recovery fix
- Add the necessary microcodes
- (Optional) transfer personal data

Running Xeon E3 v5/v6 and Xeon E‑2100/E‑2200
Server processors for LGA1151 are not very different from desktop ones. Architecturally they mirror the desktop Core SKUs based on Skylake (v5), Kaby Lake (v6), Coffee Lake (E‑2100) and Coffee Lake Refresh (E‑2200). These models support ECC memory and Intel vPro and TXT (Trusted Execution Technology). Intel deliberately restricted running server processors on regular desktop motherboards. These Xeons are officially intended only for workstation chipsets (C232/C236 for v5/v6 and C242/C246 for E‑2100/2200).
Learn more about the Xeon E3 v5 and v6 series.
Fortunately, getting them to run on regular boards is quite simple. The process is identical to retail CPUs of the same architecture, and the CoffeeTime settings are the same.
Don’t forget that running Xeon E‑2100/E‑2200 on LGA1151 v1 also requires a pinmod. For supported 300‑series boards, Coffee‑mod is not needed.

Running “mutant” CPUs

These models were originally designed for laptops using BGA1440, but aftermarket manufacturers adapted them for desktop motherboards using special interposer/adapter boards. There are Frankensteins built on all “native” 1151 architectures: Skylake, Kaby Lake, and Coffee Lake (Refresh).
We have a dedicated article about BGA1440 mutants for the LGA 1151 platform.
Workflow: obtain BIOS dump > modify BIOS > flash mod BIOS > boot
Key points:
- No pinmod is required
- They can run on all 100‑ and 200‑series chipsets; from the 300‑series only Z370, B365, and H310C are suitable
- These CPUs are more finicky (especially ES models); a 100% successful launch cannot be guaranteed
- It’s recommended to perform the first boot with one memory module, and it should support the stock frequency for your mutant
Which settings are needed in CoffeeTime?
Base settings are identical to retail CPUs on the same architecture: change ME version, disable ME, add microcodes, and update VBIOS and GOP versions.
Important: For mutants, the PCIe 1440 patch is critical; it’s best to apply all other patches and fixes as well, even if enabling them may not seem strictly necessary. Also, it’s recommended to set memory frequency to 2133 MHz on the Extra tab to avoid RAM issues on first boot.


Flashing the mod BIOS
After we’ve modified and saved the BIOS, it’s time to flash it.
- Avoid built‑in BIOS flash utilities for modded images; they often fail or may even soft‑brick the board.
- Some boards can be flashed in software (usually via FlashProgrammingTool v11 or AFUDOS 3.05.04) — typically Gigabyte, MSI, and Maxsun models.
- Most models from ASUS, ASRock, Biostar, and many other vendors block writes to the FD and ME regions, so for these it’s best to use an SPI programmer.
There’s no 100% guarantee the board will boot successfully after flashing. Even if your board can be flashed in software, we still strongly recommend having an SPI programmer on hand. If something goes wrong, returning to stock BIOS will only be possible with it.
After flashing, be sure to clear CMOS — for example, with the CLR_CMOS jumper or by cutting power and removing the battery for a few minutes.
First boot

- Before the first start, it’s recommended to fully power off the board for a short time and clear CMOS.
- Check that all cables and devices are connected correctly.
- If the PC starts, just wait: the time to first image output can be quite long. The system may also reboot by itself several times.
- Be sure to check all voltage readings and test system stability and temperatures in stress tests, games, and benchmarks.
For ASUS motherboard owners:
On ASUS boards, manual voltage tuning is almost always required after Coffee‑mod. Auto settings often result in either heavy overvoltage or insufficient voltage.
It’s recommended to set IA AC Load Line and IA DC Load Line to 0.01

Troubleshooting
If the system doesn’t start after flashing:
- Make sure you cleared BIOS via the jumper or by removing the battery
- Try booting with one memory module
- If you did a pinmod, double‑check it was done correctly
If it still doesn’t start:
- Try a different ME version in CoffeeTime
- Try modifying a different BIOS version
There’s a start, but no image (CPU with iGPU):
- Make sure you updated VBIOS and GOP versions
- Try other versions, e.g., VBIOS 1059
If NVMe boot disappeared after flashing the mod BIOS:
- Change its partition scheme from MBR to GPT. The drive still won’t appear in BIOS, but it will be selectable as a boot device.
Useful links
- Win-Raid (Main International Forum)
- Overclockers.ru (Russian Community)
- Other English Resources
- Useful Video Guides

Written by
Senior Hardware Specialist proving you don't need top-tier gear to game. Expert in smart upgrades and budget-friendly PC restoration.