Table of Contents
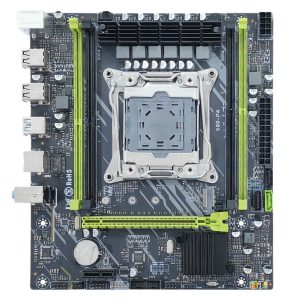
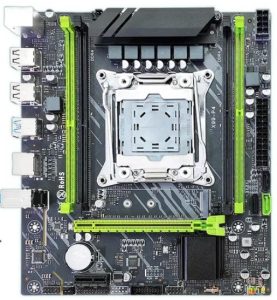
The X99-P4 motherboard appeared in 2023. It’s a typical budget Chinese board aimed at entry-level builds.
You’ll most often find it branded as ZSUS, but it’s also sold under MUCAI, MOUGOL, MACHINIST, Atermiter, Soyo, and even Huananzhi.
There’s a simplified version of this board that retains the same PCB markings — the ZSUS X99-8D4.
Specifications
| Model | X99-P4 |
|---|---|
| Socket | LGA 2011-3 |
| Chipset | H81 \ C222 \ C612 |
| Supported Processors | Intel Core i7 (5000, 6000 series, Haswell-E/Broadwell-E) Intel Xeon E5-1600 v3/v4, E5-2600 v3/v4, E5-4600 v3/v4 (Haswell-EP/Broadwell-EP) |
| VRM Configuration | 3 phase (6 virtual via doublers) Total MOSFETs: 12 (6 high-side + 6 low-side) |
| Maximum Recommended TDP | ≤90W (v3 processors) ≤100W (v4 processors) |
| Supported Memory | 4 x DDR4 DIMM (dual-channel) with ECC and non-ECC support Maximum capacity: 64 GB |
| Sleep Mode Support | No |
| Expansion Slots | 1 x PCI-e x16 (Gen 3.0) 1 x PCI-e x1 |
| Storage | 1 x SATA 3.0 2 x SATA 2.0 1 x M.2 (NVME/NGFF, Gen 3.0 x4) |
| Fan Connectors | 1 x CPU cooler (4pin) 1 x case fans (3pin) |
| PS/2 Ports | 2 (mouse + keyboard) |
| USB 3.0 Ports | 2 (+ front panel support) |
| USB 2.0 Ports | 4 (+ front panel support) |
| Network | Gigabit LAN (RTL8111H) |
| Audio | 5.1 channel (ALC897) |
| TPM 2.0 header | No |
| JLPC1 header | Yes (may be missing on some revisions) |
| Form Factor & Dimensions | mATX 215 x 190 mm |
| Approximate Price | $30 - $45 (Aliexpress) |
The X99-P4 doesn’t stand out among other budget boards. It provides the bare essentials in terms of modern I/O. The storage subsystem offers just 3 SATA ports (only one of which is SATA 6 Gb/s) and a single M.2 slot that is switchable via jumpers; it’s configured for NVMe by default.

The VRM is clearly not this model’s strong suit. It uses a classic budget configuration of three doubled phases and is not designed for high-performance processors. The board uses MOSFETs marked PQ PN0301 (x6 high-side) and PQ PN0302 (x6 low-side).
Audio is handled by the Realtek ALC897 codec. On the downside, the usual Chinese budget-board quirks apply:
Revisions
Different versions of the board exist, built on various chipsets: desktop H81 and server‑grade C222 and C612. While functionality remains similar across versions, their firmware may be mutually incompatible.
It cannot be reliably determined visually which chipset a particular sample uses. However, revisions with larger chipset heatsinks are likely based on the C612 PCH.
A note on TPM 2.0: There is no dedicated TPM 2.0 header, but the board exposes a JLPC1 (LPC) header (revision‑dependent) that can accept LPC TPM 2.0 modules. You’ll need a compatible module and UEFI/BIOS firmware with TPM support; on some boards this requires third‑party or modified firmware. Learn more about TPM 2.0 on Chinese X99 motherboards here.
BIOS Capabilities
The stock BIOS is based on American Megatrends code and is unremarkable. The typical constraints apply, with the main limitation being the lack of RAM timing controls. Fortunately, the X99‑P4 is compatible with firmware from certain other Chinese boards that expose at least basic timing settings.
| Chipset | BIOS version & date | Ram Timings | ReBAR | Unlocked CPU OC | Turbo Boost unlock | Undervolt | Notes & Link |
|---|---|---|---|---|---|---|---|
| H81 | X99D4 Ver:004 05/17/2023 | - | - | - | - | - | Stock BIOS [Download] |
| H81 | X9R9P Ver:003 01/07/2022 | + | - | - | + | -50 mV | Mod BIOS (based on Machinist MR9A PRO) [Download] |
| C222 | X99D4 Ver:004 08/01/2023 | - | - | - | - | - | Stock BIOS [Download] |
| C222 | 01/15/2021 Ver: X99MA012 | + | - | - | + | -50 mV | Mod BIOS (based on Qiyida H9 v2.0) [Download] |
| C612 | X99P4 Ver:001 10/30/2023 | - | - | - | - | - | Stock BIOS [Download] |
| C612 | X99P4 Ver:001 10/30/2023 | + | - | - | + | -50 mV | Mod BIOS (stock-based) [Download] |
Simple BIOS Flashing Guide (Windows)
- Download FPTW 9.1.10 from this page.
- Open Command Prompt as Administrator.
- Copy your BIOS file (
bios.binorbios.rom) into the same folder as FPTW. - In the Command Prompt, navigate to the FPTW folder using the
cdcommand. - Flash the BIOS with the following command:
fptw64 -f bios.bin
Note: Replace bios.bin with the actual name of your modded BIOS file, if it’s different.
After flashing, reset settings to defaults (Clear CMOS).
Frequently Asked Questions
The board won’t boot, black screen, etc. What should I do?
See our article about the most common LGA2011‑3 issues.
Where can I find drivers for this board?
The page with current drivers for socket 2011‑3 boards is located here.
Is there a manual available, maybe a PDF?
The official ZSUS manual can be downloaded here.
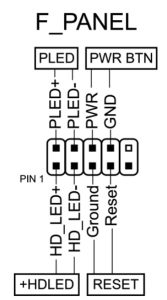
How do I connect the front panel?
