Enabling overclocking via utilities like Intel XTU isn’t difficult, but it requires unlocking hidden BIOS menus. You’ll need to:
- Dump your current BIOS
- Edit permissions in AMIBCP
- Flash the modified dump back
- Do a bit of BIOS configuration
⚠️ WARNING:
Supported CPUs: Overclocking is available ONLY on CPUs with an unlocked multiplier (Xeon E5‑1650/1660/1680 v3 + Core i7 series).
Brick Risk: This process involves flashing a modified BIOS. Incorrect use of FPTw or AMIBCP can brick your motherboard. Ensure you have a hardware programmer and a verified full backup ready before proceeding.
Power Draw: Overclocking significantly increases power consumption. Ensure your PSU and Motherboard VRM cooling are adequate.
Phase 1: Dump BIOS
Use Intel Flash Programming Tool (FPTw) to back up your current BIOS. Run command prompt as Administrator.
fptw64 -d backup.romPhase 2: Unlock Hidden Menus
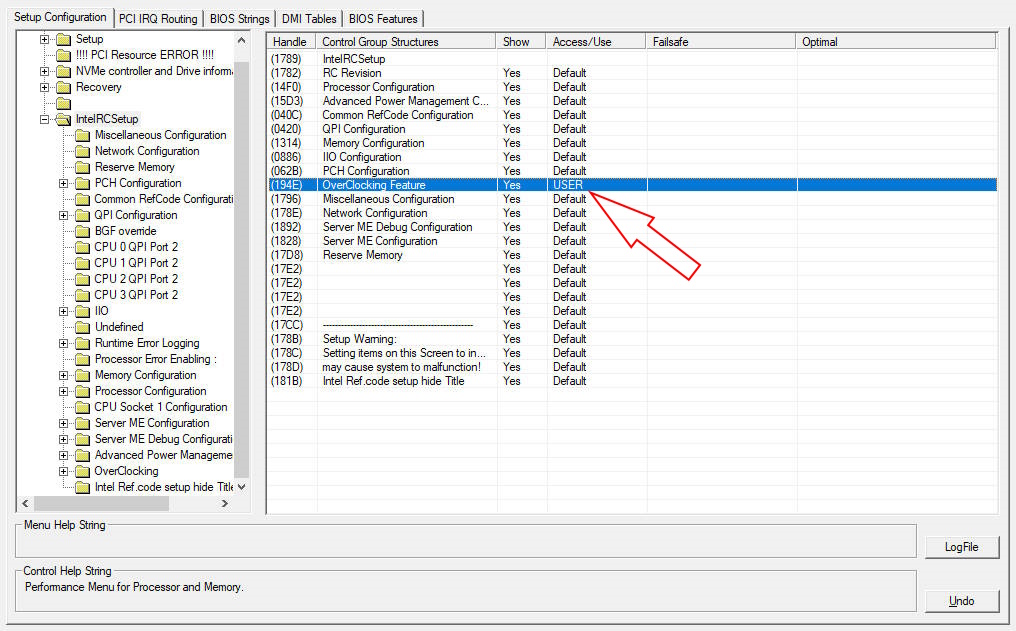
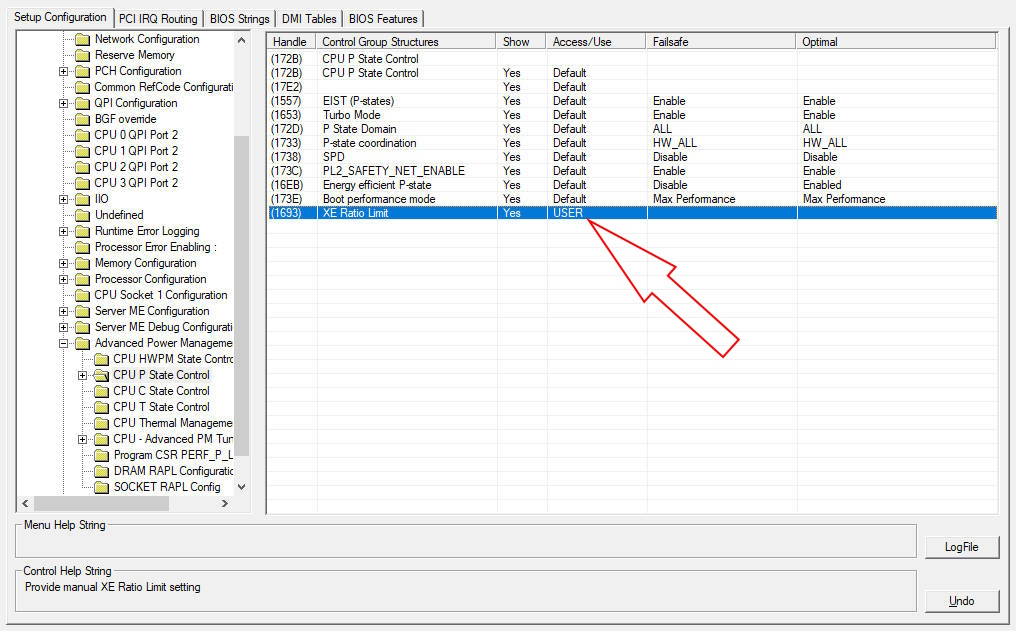
Open backup.rom in AMIBCP 5.02. Navigate to the following paths and change the value in the “Access/Use” column from Default to USER:
IntelRCSetup > OverclockingFeature(Set Access/Use to USER)
IntelRCSetup > Advanced Power Management > CPU P State Control > XE Ratio Limit(Set Access/Use to USER)
Phase 3: Flash Back
Save the modified file as mod.rom and flash it back using FPT:
fptw64 -f mod.romAfter flashing, perform a full restart.
Phase 4: BIOS Configuration
Enter BIOS (press Del). First, it is recommended to Restore Defaults to ensure clean settings.

Now configure the newly unlocked options:
1. Enable Overclocking Feature
Path: IntelRCSetup > Overclocking Feature
- Overclocking Feature: [Enabled]


2. Enable Ratio Control (Unlock XTU)
Path: IntelRCSetup > Advanced Power Management Configuration > CPU P State Control > XE Ratio Limit
- Overclocking Lock: [Disabled] (Crucial step!)
- Core Ratio Limit (Optional) : Set this slightly HIGHER than your target overclock.
(Example: If you want 4.0 GHz, set this to 41 or 42. This sets the “ceiling” for software control in Windows.)


3. C‑State Stability Settings
Path: IntelRCSetup > Advanced Power Management Configuration > CPU C State Control
- Package C State Limit: [C2] (Prevents deep‑sleep crashes)
- CPU C6 Report: [Disabled]
Note: If you don’t need power‑saving features, also disable CPU C3 Report. In that case, the CPU will always run at maximum frequency.
4. Fix Current Throttling (The PP0 Fix)
Path: IntelRCSetup > Advanced Power Management Configuration > CPU – Advanced PM Tuning > Program PP0_CURT_CFG_CTRL_MSR
This is critical. Without this fix, the motherboard will protect itself by throttling your CPU frequency under load.
- PP0 Current_Cfg_Ctl Ovrd: [Manual]
- Current Config: [Enabled]
- Current Limitation: 1600 (Value for 200 Amps)
🧮 How to calculate:
The value unit is 1/8th of an Amp. Multiply your desired Amperage by 8.
200 Amps * 8 = 1600.
Tip: 200A is very high. If your VRM gets too hot, try 1280 (160 Amps) first.
Everything is ready! Save settings (F10), boot into Windows, and start tuning with simple sliders in Intel XTU. Good luck!