
Table of Contents
- Limit resource usage. Prevent a single process from hogging every core on a multi-tasking system.
- Compatibility. Some older software misbehaves, crashes, or desyncs on modern multi-core, multi-thread systems and only runs reliably when pinned to one or two cores.
- Performance — specifically on high-core-count Xeons. Chips like the Xeon E5 v3/v4 feature high core counts paired with a fixed power budget. Under load, the CPU has to spread that budget across every active core, so all-core clocks end up lower than the chip is actually capable of. Disable a chunk of the cores, and the remaining ones get a bigger share of the power budget — often letting them boost noticeably higher. This is a common trick on LGA2011-3 boards when you’re running something single- or lightly-threaded and don’t need all 18-22 cores anyway.
Disabling cores in BIOS/UEFI
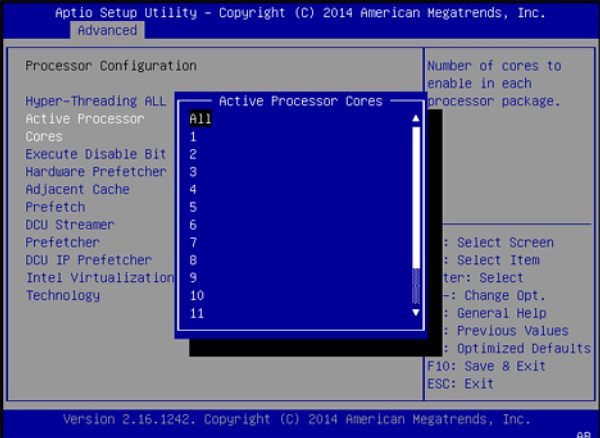
This method disables cores at the hardware level. It’s guaranteed to work, though less convenient since re-enabling them requires entering the BIOS and rebooting.
On Chinese LGA2011-3 boards, the setting usually lives at:
IntelRCSetup > Processor Configuration > Pre-Socket Configuration > CPU Socket 0 Configuration > Cores Enabled
On LGA2011 boards:
Advanced > CPU Configuration > Active Processor Cores
On other sockets and platforms, the wording varies slightly, but the option is typically located under the CPU or Processor Configuration menu.
Disabling cores via msconfig
Windows has a built-in way to cap the number of active cores without touching the BIOS at all:
- Press Win + R, type
msconfig, and hit Enter. - In System Configuration, open the Boot tab.
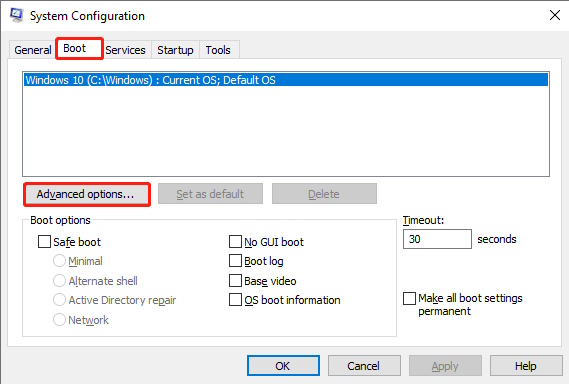
- Click Advanced options.
- Check the “Number of processors” box and select a value from the drop-down menu. Keep in mind that with Hyper-Threading enabled, Windows sees each physical core as two logical processors, so this count is logical cores, not physical ones.
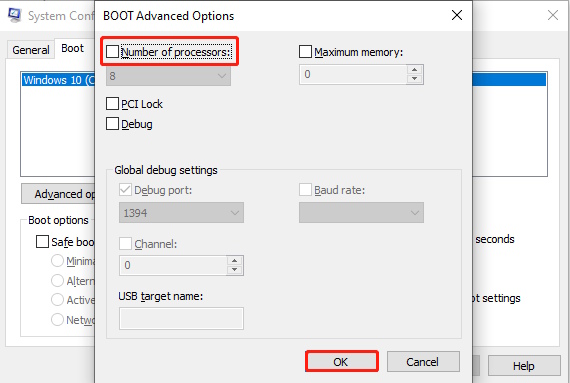
- Back in the main System Configuration window, check “Make all boot settings permanent” if you don’t want to repeat this process each time. Click Apply, then OK.
- Reboot.
Faster way to toggle this: bcdedit
The msconfig GUI is really just a front-end for a boot configuration value. You can set (and unset) the same limit directly from an elevated Command Prompt or PowerShell, which is much quicker if you switch core counts often:
bcdedit /set numproc 4 — limits Windows to 4 logical processors on next boot
bcdedit /deletevalue numproc — removes the limit, all cores come back
Save each line as its own .bat file (“Run as administrator”) and you’ve got one-click scripts to cap or restore your core count — no digging through menus, no BIOS reboot loop. A reboot is still required either way, since this is a boot-time setting.
Limiting how many cores a program can use
This approach doesn’t disable any cores — they all keep running — but a specific application is restricted to using only some of them. It won’t necessarily affect performance as dramatically as fully disabling cores, but it doesn’t require a reboot and can be applied on the fly.
There are three ways to do it: Task Manager, the command line, or a shortcut.
Using Task Manager
- Open Task Manager (Ctrl + Alt + Delete or Ctrl + Shift + Esc).
- Go to the Processes tab (Windows 7) or Details tab (Windows 8 and newer).
- Right-click the process you want to restrict and choose Set affinity.
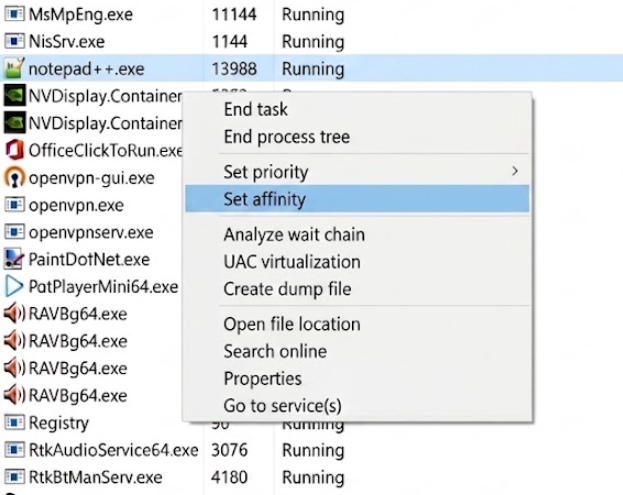
- Uncheck the logical processors you don’t want the program to use and click OK. The change applies immediately.
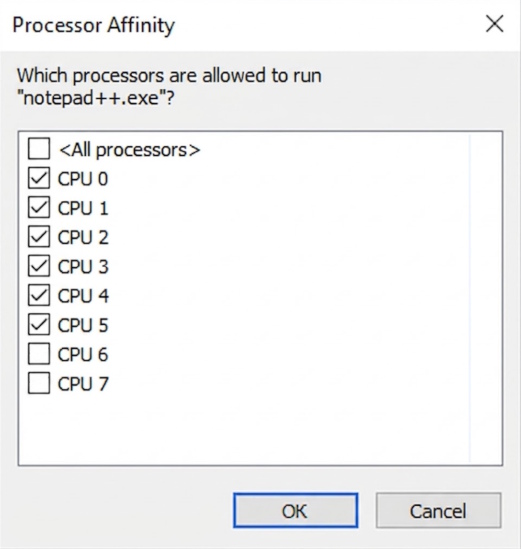
The downside: this has to be redone every time you relaunch the app, since Windows doesn’t remember affinity settings between runs.
Using the command line or a shortcut (CPU affinity)
The same thing can be done from the command line — and baked into a shortcut so you don’t have to repeat it manually. Since Windows 7, the start command supports an /affinity switch.
Example — launch Notepad++ restricted to a specific set of cores:
start "Notepad++" /affinity 5555 "C:\Program Files\Notepad++\notepad++.exe"The value right after /affinity — 5555 in this example — is the affinity mask: a hexadecimal number that tells Windows exactly which logical cores the process is allowed to use.
How the affinity mask works
Write out your logical cores as a string of binary digits, one bit per logical core, where 1 means “allowed” and 0 means “not allowed.” The rightmost bit is logical core 0, the leftmost bit is the highest-numbered core.
Take an 8-core / 16-thread CPU as an example. All cores enabled looks like this:
1111111111111111To use only the physical cores and skip their Hyper-Threading siblings, you’d alternate:
0101010101010101Convert that binary string to hexadecimal (any binary-to-hex converter will do it instantly) and you get 5555 — the exact value used in the command above.
CPU Affinity Mask Table (Cores 0–15)
| Cores Used | Binary Mask | Decimal (Affinity Mask) | Hex (for /affinity) |
|---|---|---|---|
| Core 0 only | 0000 0000 0000 0001 | 1 | 1 |
| Core 1 only | 0000 0000 0000 0010 | 2 | 2 |
| Cores 0–1 | 0000 0000 0000 0011 | 3 | 3 |
| Cores 0–2 | 0000 0000 0000 0111 | 7 | 7 |
| Cores 0–3 | 0000 0000 0000 1111 | 15 | F |
| Cores 0–4 | 0000 0000 0001 1111 | 31 | 1F |
| Cores 0–5 | 0000 0000 0011 1111 | 63 | 3F |
| Cores 0–6 | 0000 0000 0111 1111 | 127 | 7F |
| Cores 0–7 | 0000 0000 1111 1111 | 255 | FF |
| Cores 0–8 | 0000 0001 1111 1111 | 511 | 1FF |
| Cores 0–9 | 0000 0011 1111 1111 | 1023 | 3FF |
| Cores 0–10 | 0000 0111 1111 1111 | 2047 | 7FF |
| Cores 0–11 | 0000 1111 1111 1111 | 4095 | FFF |
| Cores 0–12 | 0001 1111 1111 1111 | 8191 | 1FFF |
| Cores 0–13 | 0011 1111 1111 1111 | 16383 | 3FFF |
| Cores 0–14 | 0111 1111 1111 1111 | 32767 | 7FFF |
| Cores 0–15 (All 16) | 1111 1111 1111 1111 | 65535 | FFFF |
Quick-reference table
To save you from doing the manual conversion, here is a quick reference table for common thread counts:
| Logical threads | Physical cores | All threads enabled (hex) | Physical cores only / HT off (hex) |
|---|---|---|---|
| 8 | 4 | FF | 55 |
| 12 | 6 | FFF | 555 |
| 16 | 8 | FFFF | 5555 |
| 20 | 10 | FFFFF | 55555 |
| 24 | 12 | FFFFFF | 555555 |
| 28 | 14 | FFFFFFF | 5555555 |
| 32 | 16 | FFFFFFFF | 55555555 |
| 36 | 18 | FFFFFFFFF | 555555555 |
| 44 | 22 | FFFFFFFFFFF | 55555555555 |
Once you have the mask, use it either directly from Win + R, from a Command Prompt, or bake it into a desktop shortcut:
- Right-click the desktop, choose New > Shortcut.
- In the location field, paste the same command:
cmd.exe /c start "Notepad++" /affinity 5555 "C:\Program Files\Notepad++\notepad++.exe"
Every launch from that shortcut will apply the affinity mask automatically — no need to set it manually in Task Manager each time.
Bonus: setting affinity from PowerShell
If you prefer using PowerShell over a standard command shortcut, you can set the affinity mask on a process when launching it or while it’s already running:
$p = Start-Process "C:\Program Files\Notepad++\notepad++.exe" -PassThru
$p.ProcessorAffinity = 0x5555
Prefer not to do this by hand? There’s dedicated software for it.
Tools like Process Lasso handle all of the above without shortcuts, scripts, or re-doing anything after a reboot. You set an affinity mask (and, optionally, a priority or power profile) for a specific executable once, and it’s applied automatically every single time that program runs — including after Windows updates or restarts. It also has features that go beyond what you can do manually, like ProBalance, which dynamically deprioritizes CPU-hogging background processes without touching the ones you’re actively using. It’s free for personal use, with a paid Pro tier for extra automation and cloud profile sync.
Bonus: doing the same thing on Linux
If you’re running one of these Xeons under Linux instead of Windows, the equivalent tools are:
- Per-process, on the fly:
taskset -c 0,2,4,6 ./your_programpins a program to the listed core numbers, the same idea as the Windows affinity mask. - System-wide, at boot: add
maxcpus=8(ornr_cpus=8) to the kernel boot parameters to cap the number of cores the kernel brings online — the Linux equivalent of the msconfig/bcdedit trick above.
FAQ
Does a CPU affinity setting survive closing and reopening the program?
No. Affinity set through Task Manager or a one-off command only applies to that running process. Use a shortcut or script (as above) if you want it applied automatically every time you launch the app — or use dedicated software like Process Lasso, which does this natively.
Will disabling cores actually raise my clock speed?
On CPUs with per-core turbo bins — which covers most Xeon E5 v2/v3/v4 chips — yes, it usually will, since the remaining active cores get a larger share of the power budget. How much you gain depends on the specific SKU and your motherboard’s power limits, so it’s worth comparing clocks before and after under load with a monitoring tool.
Do I need to reboot every time I want to change the core count?
Only for the BIOS and msconfig/bcdedit methods, since both are boot-time settings. The Task Manager / affinity mask method applies instantly, with no reboot.

Written by
Senior Hardware Specialist proving you don't need top-tier gear to game. Expert in smart upgrades and budget-friendly PC restoration.